Android系统启启动_Launcher

​ 此前的文章我们学习了init进程、Zygote进程和SyetemServer进程的启动过程,这一篇文章我们就来学习Android系统启动流程的最后一步:Launcher的启动流程,并结合本系列的前三篇文章的内容来讲解Android系统启动流程。

Launcher概述

​ Android系统启动的最后一步是启动一个Home应用程序,这个应用程序用来显示系统中已经安装的应用程序,这个Home应用程序就叫做Launcher。应用程序Launcher在启动过程中会请求PackageManagerService返回系统中已经安装的应用程序的信息,并将这些信息封装成一个快捷图标列表显示在系统屏幕上,这样用户可以通过点击这些快捷图标来启动相应的应用程序。

Launcher启动流程

​ SyetemServer进程在启动的过程中会启动PackageManagerService,PackageManagerService启动后会将系统中的应用程序安装完成。在此前已经启动的ActivityManagerService会将Launcher启动起来。
启动Launcher的入口为ActivityManagerService的systemReady函数,如下所示。

1
2
3
4
5
6
7
8
9
10
11
12
13
//frameworks/base/services/java/com/android/server/SystemServer.java
private void startOtherServices() {
...
mActivityManagerService.systemReady(new Runnable() {
@Override
public void run() {
Slog.i(TAG, "Making services ready");
mSystemServiceManager.startBootPhase(
SystemService.PHASE_ACTIVITY_MANAGER_READY);
...
}
...
}

在startOtherServices函数中,会调用ActivityManagerService的systemReady函数:

1
2
3
4
5
6
7
8
9
//frameworks/base/services/core/java/com/android/server/am/ActivityManagerService.java
public void systemReady(final Runnable goingCallback) {
...
synchronized (this) {
...
mStackSupervisor.resumeFocusedStackTopActivityLocked();
mUserController.sendUserSwitchBroadcastsLocked(-1, currentUserId);
}
}

systemReady函数中调用了ActivityStackSupervisor的resumeFocusedStackTopActivityLocked函数:

1
2
3
4
5
6
7
8
9
10
11
12
13
14
15
16
//frameworks/base/services/core/java/com/android/server/am/ActivityStackSupervisor.java
boolean resumeFocusedStackTopActivityLocked() {
return resumeFocusedStackTopActivityLocked(null, null, null);
}

boolean resumeFocusedStackTopActivityLocked(
ActivityStack targetStack, ActivityRecord target, ActivityOptions targetOptions) {
if (targetStack != null && isFocusedStack(targetStack)) {
return targetStack.resumeTopActivityUncheckedLocked(target, targetOptions);
}
final ActivityRecord r = mFocusedStack.topRunningActivityLocked();
if (r == null || r.state != RESUMED) {
mFocusedStack.resumeTopActivityUncheckedLocked(null, null);
}
return false;
}

ActivityStack对象是用来描述Activity堆栈的,resumeTopActivityUncheckedLocked函数如下所示。

1
2
3
4
5
6
7
8
9
10
11
12
13
14
15
16
17
18
19
boolean resumeTopActivityUncheckedLocked(ActivityRecord prev, ActivityOptions options) {
if (mStackSupervisor.inResumeTopActivity) {
// Don't even start recursing.
return false;
}
boolean result = false;
try {
// Protect against recursion.
mStackSupervisor.inResumeTopActivity = true;
if (mService.mLockScreenShown == ActivityManagerService.LOCK_SCREEN_LEAVING) {
mService.mLockScreenShown = ActivityManagerService.LOCK_SCREEN_HIDDEN;
mService.updateSleepIfNeededLocked();
}
result = resumeTopActivityInnerLocked(prev, options);
} finally {
mStackSupervisor.inResumeTopActivity = false;
}
return result;
}

调用了resumeTopActivityInnerLocked函数

1
2
3
4
5
6
7
8
private boolean resumeTopActivityInnerLocked(ActivityRecord prev, ActivityOptions options) {
// Let's just start up the Launcher...
ActivityOptions.abort(options);
if (DEBUG_STACK) mStackSupervisor.validateTopActivitiesLocked();
// Only resume home if on home display
return isOnHomeDisplay() &&
mStackSupervisor.resumeHomeStackTask(returnTaskType, prev, reason);
}

resumeTopActivityInnerLocked函数的代码很长,我们截取我们要分析的关键的一句:调用ActivityStackSupervisor的resumeHomeStackTask函数,代码如下所示。

1
2
3
4
5
6
7
8
9
10
11
12
boolean resumeHomeStackTask(int homeStackTaskType, ActivityRecord prev, String reason) {
mHomeStack.moveHomeStackTaskToTop(homeStackTaskType);
ActivityRecord r = getHomeActivity();
final String myReason = reason + " resumeHomeStackTask";

// Only resume home activity if isn't finishing.
if (r != null && !r.finishing) {
mService.setFocusedActivityLocked(r, myReason);
return resumeFocusedStackTopActivityLocked(mHomeStack, prev, null);
}
return mService.startHomeActivityLocked(mCurrentUser, myReason);
}

调用了ActivityManagerService的startHomeActivityLocked函数

1
2
3
4
5
6
7
8
9
10
11
12
13
14
15
16
17
18
19
20
21
22
23
24
25
26
27
28
29
30
31
boolean startHomeActivityLocked(int userId, String reason) {
if (mFactoryTest == FactoryTest.FACTORY_TEST_LOW_LEVEL
&& mTopAction == null) {//1
// We are running in factory test mode, but unable to find
// the factory test app, so just sit around displaying the
// error message and don't try to start anything.
return false;
}
// UNIONMAN BEGIN
setDefaultLauncher();
// UNIONMAN END
Intent intent = getHomeIntent();//2
ActivityInfo aInfo = resolveActivityInfo(intent, STOCK_PM_FLAGS, userId);
if (aInfo != null) {
intent.setComponent(new ComponentName(aInfo.applicationInfo.packageName, aInfo.name));
// Don't do this if the home app is currently being
// instrumented.
aInfo = new ActivityInfo(aInfo);
aInfo.applicationInfo = getAppInfoForUser(aInfo.applicationInfo, userId);
ProcessRecord app = getProcessRecordLocked(aInfo.processName,
aInfo.applicationInfo.uid, true);
if (app == null || app.instrumentationClass == null) {//3
intent.setFlags(intent.getFlags() | Intent.FLAG_ACTIVITY_NEW_TASK);
mActivityStarter.startHomeActivityLocked(intent, aInfo, reason);//4
}
} else {
Slog.wtf(TAG, "No home screen found for " + intent, new Throwable());
}

return true;
}

mFactoryTest代表系统的运行模式,系统的运行模式分为三种,分别是非工厂模式、低级工厂模式和高级工厂模式,mTopAction则用来描述第一个被启动Activity组件的Action,它的值为Intent.ACTION_MAIN。因此注释1的代码意思就是mFactoryTest为FactoryTest.FACTORY_TEST_LOW_LEVEL(低级工厂模式)并且mTopAction=null时,直接返回false。getHomeIntent函数如下所示。

1
2
3
4
5
6
7
8
9
Intent getHomeIntent() {
Intent intent = new Intent(mTopAction, mTopData != null ? Uri.parse(mTopData) : null);
intent.setComponent(mTopComponent);
intent.addFlags(Intent.FLAG_DEBUG_TRIAGED_MISSING);
if (mFactoryTest != FactoryTest.FACTORY_TEST_LOW_LEVEL) {
intent.addCategory(Intent.CATEGORY_HOME);
}
return intent;
}

getHomeIntent函数中创建了Intent,并将mTopAction和mTopData传入。mTopAction的值为Intent.ACTION_MAIN,并且如果系统运行模式不是低级工厂模式则将intent的Category设置为Intent.CATEGORY_HOME。我们再回到ActivityManagerService的startHomeActivityLocked函数,假设系统的运行模式不是低级工厂模式,在注释3处判断符合Action为Intent.ACTION_MAIN,Category为Intent.CATEGORY_HOME的应用程序是否已经启动,如果没启动则调用注释4的方法启动该应用程序。
这个被启动的应用程序就是Launcher,因为Launcher的Manifest文件中的intent-filter标签匹配了Action为Intent.ACTION_MAIN,Category为Intent.CATEGORY_HOME。

1
2
3
4
5
6
7
8
9
10
11
12
13
<activity
android:name="com.android.launcher2.Launcher"
android:launchMode="singleTask"
android:clearTaskOnLaunch="true"
android:stateNotNeeded="true"
android:screenOrientation="landscape">
<intent-filter>
<action android:name="android.intent.action.MAIN" />
<category android:name="android.intent.category.HOME" />
<category android:name="android.intent.category.DEFAULT" />
<category android:name="android.intent.category.MONKEY"/>
</intent-filter>
</activity>

这样,应用程序Launcher就会被启动起来,并执行它的onCreate函数。

设置默认Launcher

但是,如果我们安装了多个Launcher,那应该怎么处理?

在getHomeIntent()之前,我们可以设置一个默认Launcher。

1
2


总结

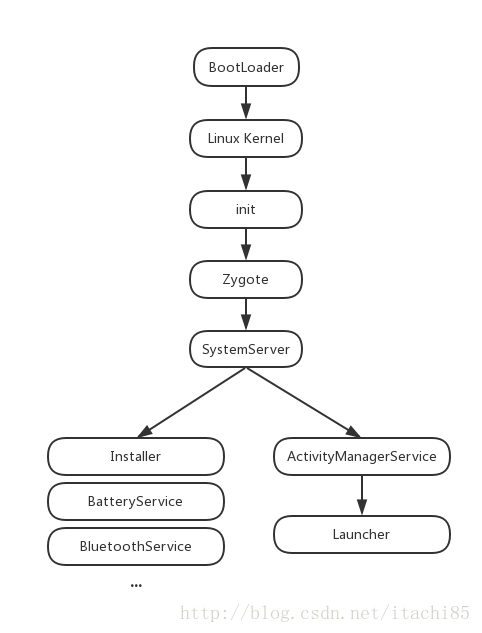
那么结合本篇以及本系列的前三篇文章,我们就可以得出Android系统启动流程,如下所示。

  1. 启动电源以及系统启动
    当电源按下时引导芯片代码开始从预定义的地方(固化在ROM)开始执行。加载引导程序Bootloader到RAM,然后执行。
  2. 引导程序BootLoader
    引导程序BootLoader是在Android操作系统开始运行前的一个小程序,它的主要作用是把系统OS拉起来并运行。
  3. Linux内核启动
    内核启动时,设置缓存、被保护存储器、计划列表、加载驱动。当内核完成系统设置,它首先在系统文件中寻找init.rc文件,并启动init进程。
  4. init进程启动
    初始化和启动属性服务,并且启动Zygote进程。
  5. Zygote进程启动
    创建JavaVM并为JavaVM注册JNI,创建服务端Socket,启动SystemServer进程。
  6. SystemServer进程启动
    启动Binder线程池和SystemServiceManager,并且启动各种系统服务。
  7. Launcher启动

img

原文:https://blog.csdn.net/itachi85/article/details/56669808