Android系统按键(海思为例)上报流程

android系统的键值转换,从linux到java共经历3个层次,分别是:

  • linux系统层,原始ir键值读取,转变为linux层键值
  • framework层,linux层键值转换为android键值
  • framework层,android键值上报java层

原始ir键值读取,转变为linux层键值

核心输入: 系统启动android_ir_user后台进程

核心输出: 虚拟设备dev/vinput,写入linux键值

转换流程详细说明:

定义原始硬件码值和对应linux层通用键名

/device/hisilicon/bigfish/system/ir_user/key_pars/key.xml

该文件编译后输出到system/etc目录下。

1
2
3
4
5
6
7
8
9
10
<?xml version="1.0" encoding="utf-8"?>
<key_xml>
<hisi-key>
<key value="0x35caff00" name="KEY_UP" /> <!--key up-->
<key value="0x2dd2ff00" name="KEY_DOWN" /> <!--key down-->
<key value="0x3ec1ff00" name="KEY_RIGHT" /> <!--key right-->
...
<key value="0x7d82ff00" name="KEY_FN_B" /> <!-- -->
<key value="0x639c4db2" name="KEY_MUTE" /> <!-- -->
</hisi-key>

定义linux层通用键名和linux层键值的对应关系

/device/hisilicon/bigfish/system/ir_user/key_pars/linux_key.h

1
2
3
4
5
6
7
const linux_keycode_ary Linux_KeyCode_Ary[512]=
{
{"KEY_RESERVED",0},
{"KEY_ESC", 1},
...
{"KEY_MUTE", 113},
}

提供接口get_keycode解析xml建立原始码值和linux层键值的映射数组

/device/hisilicon/bigfish/system/ir_user/key_pars/ key_pars.c

####android_ir_user

/device/hisilicon/bigfish/system/ir_user/ir_user.cpp

  • 编译为后台进程android_ir_user独立运行;
  • 进程启动,执行main入口函数,调用get_keycode完成key.xml存储原始码值和linux层键值的映射关系到数组keyarry;
  • 建立ir_sample_thread线程读取原始码值,根据keyarry转换为linux层键值,通过ReportKeyEvent写入dev/vinput设备,其他进程可以读取键值

linux层键值转换为Android键值

核心输入: /dev/input, 输入linux键值

核心输出: getEvents(),输出RawEvent* buffer,存储linux层键值;mapKey(),将linux层键值转换为android键值

  1. 定义linux键值和对应的键名字符串

/device/hisilicon/bigfish/prebuilts/Vendor_0001_Product_0001.kl:

1
2
3
4
5
6
key 111   FORWARD_DEL
# key 112 "KEY_MACRO"
key 113 VOLUME_MUTE
key 114 VOLUME_DOWN
key 115 VOLUME_UP
key 116 POWER
  1. 定义键名字符串和android java层键值对应关系结构数组KEYCODES

/frameworks/native/include/input/KeycodeLabels.h

1
{ "MUTE", 91 }
  1. \frameworks\native\libs\input\Keyboard.cpp

    • 提供函数loadKeyLayout和getPath,定位linux到android键第一转换映射文件为Vendor_0001_Product_0001.kl
    • 提供函数getKeyCodeByLabel,从KeycodeLabels.h的KEYCODES数组中,查询返回android的java键值。
  2. \frameworks\native\libs\input\KeyLayoutMap.cpp

    • 提供函数load和parse等解析Vendor_0001_Product_0001.kl,并调用Keyboard.cpp的getKeyCodeByLabel,通过“linux键值—键名字符串—android的java层键值”的直接建立“linux键值— android的java层键值”map集合;
    • 提供函数mapKey基于此集合供上层转换linux键值为android的java键值
  3. \frameworks\base\services\input\EventHub.cpp

    • 提供getEvents,完成两个事:
      1. 建立linux键值— android的java层键值”map集合。
      2. 扫描linux键值,存储到参数RawEvent* buffer。
    • 提供mapKey,调用KeyLayoutMap.cpp的mapKey函数,完成转换linux键值为android的java键值
  4. 关于建立linux键值—android的java层键值”map集合,代码流程:

    • \frameworks\base\services\input\EventHub.cpp

      1
      2
      3
      4
      void EventHub::scanDevicesLocked() {
      status_t res = scanDirLocked(DEVICE_PATH);
      ...
      }
      1
      2
      3
      4
      5
      6
      status_t EventHub::scanDirLocked(const char *dirname)
      {
      ...
      openDeviceLocked(devname);
      ...
      }
      1
      2
      3
      4
      5
      6
      7
      8
      9
      status_t EventHub::openDeviceLocked(const char *devicePath) {
      // Load the key map.
      // We need to do this for joysticks too because the key layout may specify axes.
      status_t keyMapStatus = NAME_NOT_FOUND;
      if (device->classes & (INPUT_DEVICE_CLASS_KEYBOARD | INPUT_DEVICE_CLASS_JOYSTICK)) {
      // Load the keymap for the device.
      keyMapStatus = loadKeyMapLocked(device);
      }
      }
      1
      2
      3
      status_t EventHub::loadKeyMapLocked(Device* device) {
      return device->keyMap.load(device->identifier, device->configuration);
      }
    • /frameworks/native/libs/input/Keyboard.cpp

      loadKeyMapLocked调用Keyboard.cpp下load()函数:

1
2
3
4
5
6
7
8
9
10
11
12
13
14
15
16
17
18
19
20
21
status_t KeyMap::load(const InputDeviceIdentifier& deviceIdenfifier,
const PropertyMap* deviceConfiguration) {
// Use the configured key layout if available.
...
// Try searching by device identifier.
if (probeKeyMap(deviceIdenfifier, String8::empty())) {
return OK;
}
// Fall back on the Generic key map.
// TODO Apply some additional heuristics here to figure out what kind of
// generic key map to use (US English, etc.) for typical external keyboards.
if (probeKeyMap(deviceIdenfifier, String8("Generic"))) {
return OK;
}

// Try the Virtual key map as a last resort.
if (probeKeyMap(deviceIdenfifier, String8("Virtual"))) {
return OK;
}
return NAME_NOT_FOUND;
}
1
2
3
4
5
6
7
8
9
10
bool KeyMap::probeKeyMap(const InputDeviceIdentifier& deviceIdentifier,
const String8& keyMapName) {
if (!haveKeyLayout()) {
loadKeyLayout(deviceIdentifier, keyMapName);
}
if (!haveKeyCharacterMap()) {
loadKeyCharacterMap(deviceIdentifier, keyMapName);
}
return isComplete();
}
1
2
3
4
5
6
7
8
9
10
11
status_t KeyMap::loadKeyLayout(const InputDeviceIdentifier& deviceIdentifier,
const String8& name) {
String8 path(getPath(deviceIdentifier, name,
INPUT_DEVICE_CONFIGURATION_FILE_TYPE_KEY_LAYOUT));
status_t status = KeyLayoutMap::load(path, &keyLayoutMap);
if (status) {
return status;
}
keyLayoutFile.setTo(path);
return OK;
}
1
2
3
4
5
6
String8 KeyMap::getPath(const InputDeviceIdentifier& deviceIdentifier,
const String8& name, InputDeviceConfigurationFileType type) {
return name.isEmpty()
? getInputDeviceConfigurationFilePathByDeviceIdentifier(deviceIdentifier, type)
: getInputDeviceConfigurationFilePathByName(name, type);
}

这里才确定path为:./system/usr/keylayout/Vendor_0001_Product_0001.kl

再继续调用KeyLayoutMap::load加载并解析

./frameworks/native/libs/input/KeyLayoutMap.cpp

1
2
3
4
5
6
status_t KeyLayoutMap::load(const String8& filename, sp<KeyLayoutMap>* outMap) {
outMap->clear();
...
Parser parser(map.get(), tokenizer);
status = parser.parse();
}
1
2
3
4
5
6
7
8
9
10
11
12
13
14
15
16
17
18
19
20
21
22
23
24
25
26
27
28
29
30
31
32
33
34
35
36
37
38
39
40
41
42
status_t KeyLayoutMap::Parser::parse() {
while (!mTokenizer->isEof()) {
#if DEBUG_PARSER
ALOGD("Parsing %s: '%s'.", mTokenizer->getLocation().string(),
mTokenizer->peekRemainderOfLine().string());
#endif

mTokenizer->skipDelimiters(WHITESPACE);

if (!mTokenizer->isEol() && mTokenizer->peekChar() != '#') {
String8 keywordToken = mTokenizer->nextToken(WHITESPACE);
if (keywordToken == "key") {
mTokenizer->skipDelimiters(WHITESPACE);
status_t status = parseKey();
if (status) return status;
} else if (keywordToken == "axis") {
mTokenizer->skipDelimiters(WHITESPACE);
status_t status = parseAxis();
if (status) return status;
} else if (keywordToken == "led") {
mTokenizer->skipDelimiters(WHITESPACE);
status_t status = parseLed();
if (status) return status;
} else {
ALOGE("%s: Expected keyword, got '%s'.", mTokenizer->getLocation().string(),
keywordToken.string());
return BAD_VALUE;
}

mTokenizer->skipDelimiters(WHITESPACE);
if (!mTokenizer->isEol() && mTokenizer->peekChar() != '#') {
ALOGE("%s: Expected end of line or trailing comment, got '%s'.",
mTokenizer->getLocation().string(),
mTokenizer->peekRemainderOfLine().string());
return BAD_VALUE;
}
}

mTokenizer->nextLine();
}
return NO_ERROR;
}

解析Vendor_0001_Product_0001.kl得到linux层code,再调用getKeyCodeByLabel查询code对应的android层键值keyCode

1
2
3
4
5
6
7
8
9
10
11
12
13
14
status_t KeyLayoutMap::Parser::parseKey() {
...
KeyedVector<int32_t, Key>& map = mapUsage ? mMap->mKeysByUsageCode : mMap->mKeysByScanCode;
int32_t code = int32_t(strtol(codeToken.string(), &end, 0));
...
int32_t keyCode = getKeyCodeByLabel(keyCodeToken.string());
if (!keyCode) {
return BAD_VALUE;
}
Key key;
key.keyCode = keyCode;
key.flags = flags;
map.add(code, key);
}

将两个键值存入map集合,到此完成linux层键值到android的java层键值的转换并存储为map集合;后面真正扫描到 linux键值后,调用mapKey根据存储的map集成转换为android键值进行上报。

  • 总结:

这个部分可以看出,其完全是个中间过程,如果我们要修改某个键在android的表现,完全不用改这其中相关的任何文件,只需要在java层(后面会讲到,keyevent.java)对收到的android键进行再转换即可。

###Android键值上报应用层

核心输入 : eventhub.cpp的getEvents()和mapkey()

核心输出:PhoneWindowManager.java的interceptKeyBeforeQueueing和 interceptKeyBeforeDispatching

InputReader是在InputReaderThread中启动的,调用时序图如下所示。
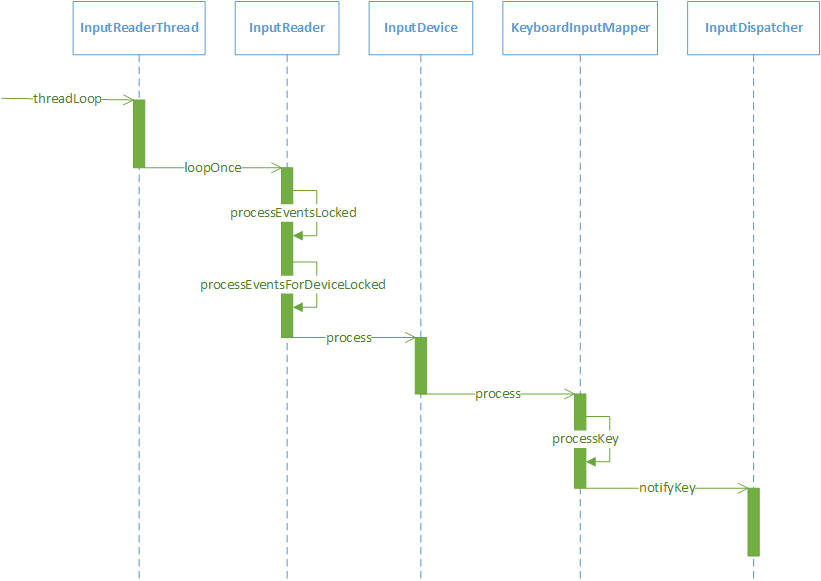
InputReaderThread的threadLoop函数如下所示。
frameworks/native/services/inputflinger/InputReader.cpp

1
2
3
4
bool InputReaderThread::threadLoop() {
mReader->loopOnce();
return true;
}

threadLoop函数中只调用了InputReader的loopOnce函数:
frameworks/native/services/inputflinger/InputReader.cpp

1
2
3
4
5
6
7
8
9
10
11
12
13
void InputReader::loopOnce() {
...
//通过EventHub的getEvents函数获取事件信息存在mEventBuffer中
size_t count = mEventHub->getEvents(timeoutMillis, mEventBuffer, EVENT_BUFFER_SIZE);//1
{ // acquire lock
AutoMutex _l(mLock);
mReaderIsAliveCondition.broadcast();
if (count) {
//如果有事件信息,调用processEventsLocked函数对事件进行加工处理
processEventsLocked(mEventBuffer, count);//2
}
...
}

InputReader主要负责:linux按键的读取;转换为android键值;通过listener启动按键上报,注意这里仅仅是启动按键上报。

InputReader 类构造函数InputReader两个极其重要的参数: eventHub和listener,前者用来读取linux键值,后者用来分发上报按键。

说明:参数eventHub,赋值给变量mEventHub;listener作为参数创建了mQueuedListener。

1
2
3
4
5
6
7
8
9
10
11
12
13
14
15
16
InputReader::InputReader(const sp<EventHubInterface>& eventHub,
const sp<InputReaderPolicyInterface>& policy,
const sp<InputListenerInterface>& listener) :
mContext(this), mEventHub(eventHub), mPolicy(policy),
mGlobalMetaState(0), mGeneration(1),
mDisableVirtualKeysTimeout(LLONG_MIN), mNextTimeout(LLONG_MAX),
mConfigurationChangesToRefresh(0) {
mQueuedListener = new QueuedInputListener(listener);

{ // acquire lock
AutoMutex _l(mLock);

refreshConfigurationLocked(0);
updateGlobalMetaStateLocked();
} // release lock
}

注释1处调用EventHub的getEvents函数来获取设备节点的事件信息到mEventBuffer中,事件信息主要有两种,一种是设备节点的增删事件(设备事件),一种是原始输入事件。注释2处的processEventsLocked函数用于对mEventBuffer中的原始输入事件信息进行加工处理,加工后的输入事件会交由InputDispatcher来处理processEventsLocked函数如下所示。

1
2
3
4
5
6
7
8
9
10
11
12
13
14
15
16
17
18
19
20
21
22
23
24
25
26
27
28
29
30
31
32
33
34
35
36
37
38
39
40
41
void InputReader::processEventsLocked(const RawEvent* rawEvents, size_t count) {
//遍历所有的事件
for (const RawEvent* rawEvent = rawEvents; count;) {
int32_t type = rawEvent->type;
size_t batchSize = 1;
//事件类型分为原始输入事件和设备事件,这个条件语句对原始输入事件进行处理
if (type < EventHubInterface::FIRST_SYNTHETIC_EVENT) {
int32_t deviceId = rawEvent->deviceId;
while (batchSize < count) {
if (rawEvent[batchSize].type >= EventHubInterface::FIRST_SYNTHETIC_EVENT
|| rawEvent[batchSize].deviceId != deviceId) {
break;
}
batchSize += 1;
}
#if DEBUG_RAW_EVENTS
ALOGD("BatchSize: %d Count: %d", batchSize, count);
#endif
//处理deviceId所对应的设备的原始输入事件
processEventsForDeviceLocked(deviceId, rawEvent, batchSize);//1
} else {
//对设备事件进行处理
switch (rawEvent->type) {
case EventHubInterface::DEVICE_ADDED:
addDeviceLocked(rawEvent->when, rawEvent->deviceId);
break;
case EventHubInterface::DEVICE_REMOVED:
removeDeviceLocked(rawEvent->when, rawEvent->deviceId);
break;
case EventHubInterface::FINISHED_DEVICE_SCAN:
handleConfigurationChangedLocked(rawEvent->when);
break;
default:
ALOG_ASSERT(false); // can't happen
break;
}
}
count -= batchSize;
rawEvent += batchSize;
}
}
1
2
3
4
bool InputReaderThread::threadLoop() {
mReader->loopOnce();
return true;
}

loopOnce函数及其调用的一连串函数,调用mEventHub->getEvents读取linux按键到RawEvent 类型的mEventBuffer成员变量;调用processEventsLocked分发上报。

1
2
3
4
5
6
7
8
9
10
11
12
13
14
15
16
17
18
19
20
21
22
23
void InputReader::loopOnce() {
...
//通过EventHub的getEvents函数获取事件信息存在mEventBuffer中
size_t count = mEventHub->getEvents(timeoutMillis, mEventBuffer, EVENT_BUFFER_SIZE);//1
{ // acquire lock
AutoMutex _l(mLock);
mReaderIsAliveCondition.broadcast();
if (count) {
//如果有事件信息,调用processEventsLocked函数对事件进行加工处理
processEventsLocked(mEventBuffer, count);//2
}
...
}void InputReader::loopOnce() {
size_t count = mEventHub->getEvents(timeoutMillis, mEventBuffer, EVENT_BUFFER_SIZE);
{ // acquire lock
AutoMutex _l(mLock);
mReaderIsAliveCondition.broadcast();

if (count) {
processEventsLocked(mEventBuffer, count);
}
mQueuedListener->flush();
}

InputReader的processEventsLocked函数首先遍历了所有的事件,这些事件用RawEvent对象来表示,将原始
输入事件和设备事件分开处理,其中设备事件分为DEVICE_ADDED、DEVICE_REMOVED和FINISHED_DEVICE_SCAN,这些事件是在EventHub的getEvent函数中生成的。如果是DEVICE_ADDED事件(设备添加事件),InputReader会新建InputDevice对象,用来存储设备信息,并且会将InputDevice存储在
KeyedVector类型的容器mDevices中。
同一个设备的输入事件交给processEventsForDeviceLocked函数来处理。

frameworks/native/services/inputflinger/InputReader.cpp

1
2
3
4
5
6
7
8
9
10
11
12
13
14
void InputReader::processEventsForDeviceLocked(int32_t deviceId,
const RawEvent* rawEvents, size_t count) {
ssize_t deviceIndex = mDevices.indexOfKey(deviceId);//1
if (deviceIndex < 0) {
ALOGW("Discarding event for unknown deviceId %d.", deviceId);
return;
}
InputDevice* device = mDevices.valueAt(deviceIndex);//2
if (device->isIgnored()) {
//ALOGD("Discarding event for ignored deviceId %d.", deviceId);
return;
}
device->process(rawEvents, count);
}

注释1处根据deviceId从mDevices中获取对应的deviceIndex,注释2处再根据这个deviceIndex从mDevices中获取对应的InputDevice。最后会调用InputDevice的process函数:

1
2
3
4
5
6
7
8
9
10
11
12
13
14
15
16
17
18
19
20
void InputDevice::process(const RawEvent* rawEvents, size_t count) {*
size_t numMappers = mMappers.size();
//遍历处理该InputDevice所有的事件
for (const RawEvent* rawEvent = rawEvents; count--; rawEvent++) {
#if DEBUG_RAW_EVENTS
ALOGD("Input event: device=%d type=0x%04x code=0x%04x value=0x%08x when=%lld",
rawEvent->deviceId, rawEvent->type, rawEvent->code, rawEvent->value,
rawEvent->when);
#endif
//mDropUntilNextSync的值默认为false,如果设备的输入事件缓冲区溢出,这个值会置为true。
if (mDropUntilNextSync) {
...
} else {
for (size_t i = 0; i < numMappers; i++) {//1
InputMapper* mapper = mMappers[i];
mapper->process(rawEvent);//2
}
}
}
}

首先会遍历InputDevice中的所有的事件,真正加工原始输入事件的是InputMapper对象,由于原始输入事件的类型很多,因此在InputMapper有很多子类,用于加工不同的原始输入事件,比如KeyboardInputMapper用于处理键盘输入事件,TouchInputMapper用于处理触摸输入事件。
注释1处遍历所有的InputMapper,在注释2处将原始输入事件交由这些InputMapper来处理,至于是哪个InputMapper来处理,InputReader并不关心。
这里就以处理键盘输入事件为例,KeyboardInputMapper的process函数如下所示。
frameworks/native/services/inputflinger/InputReader.cpp

1
2
3
4
5
6
7
8
9
10
11
12
13
14
void KeyboardInputMapper::process(const RawEvent* rawEvent) {
switch (rawEvent->type) {
case EV_KEY: {//1
int32_t scanCode = rawEvent->code;
int32_t usageCode = mCurrentHidUsage;
mCurrentHidUsage = 0;
if (isKeyboardOrGamepadKey(scanCode)) {
processKey(rawEvent->when, rawEvent->value != 0, scanCode, usageCode);//2
}
break;
}
...
}
}

注释1处,如果事件的类型为按键类型的事件,就会调用注释2处的KeyboardInputMapper的processKey函数。
frameworks/native/services/inputflinger/InputReader.cpp

1
2
3
4
5
6
7
8
void KeyboardInputMapper::processKey(nsecs_t when, bool down, int32_t scanCode,
int32_t usageCode) {
...
NotifyKeyArgs args(when, getDeviceId(), mSource, policyFlags,
down ? AKEY_EVENT_ACTION_DOWN : AKEY_EVENT_ACTION_UP,
AKEY_EVENT_FLAG_FROM_SYSTEM, keyCode, scanCode, keyMetaState, downTime);
getListener()->notifyKey(&args);//1
}

注意这里的getListener就是取得inputreader类初始化时用参数“const sp& listener”初始化的mQueuedListener。

到这里,Inputread.cpp模块的按键分发上报全部完成,后续只要搞清楚sp& listener”到底是谁,就知道按键分发到哪里去了。

InputDispatcher继承了InputDispatcherInterface,而InputDispatcherInterface继承了InputListenerInterface,因此注释1处实际上是调用了InputDispatcher的notifyKey函数,将NotifyKeyArgs交给InputDispatcher处理。

1
2
3
4
5
6
7
8
9
10
11
12
13
14
15
16
17
18
19
20
21
22
23
24
25
void InputDispatcher::notifyKey(const NotifyKeyArgs* args) {
...
bool needWake;
{ // acquire lock
mLock.lock();
if (shouldSendKeyToInputFilterLocked(args)) {
mLock.unlock();
policyFlags |= POLICY_FLAG_FILTERED;
if (!mPolicy->filterInputEvent(&event, policyFlags)) {
return; // event was consumed by the filter
}
mLock.lock();
}
int32_t repeatCount = 0;
KeyEntry* newEntry = new KeyEntry(args->eventTime,
args->deviceId, args->source, policyFlags,
args->action, flags, keyCode, args->scanCode,
metaState, repeatCount, args->downTime);//1
needWake = enqueueInboundEventLocked(newEntry);//2
mLock.unlock();
} // release lock
if (needWake) {
mLooper->wake();
}
}

代码块中采用Mutex互斥锁的形式,在注释1处根据NotifyKeyArgs,重新封装一个KeyEntry对象,代表一次按键数据。注释2处根据KeyEntry,来判断是否需要将睡眠中的InputDispatcherThread唤醒,如果需要,就调用Looper的wake函数进行唤醒,InputDispatcherThread被唤醒后就会重新对输入事件的分发。

InputDispatcher的启动过程

InputDispatcher是真正的按键数据上报的起点,InputReader中的listener实际就是这个InputDispatcher,该类继承自接口InputDispatcherInterface。

完成3个事情:

interceptKeyBeforeQueueing:按键入列前的截获处理

interceptKeyBeforeDispatching:按键从队列分发上层app前的截获处理

startDispatchCycleLocked:完成按键最终分发上报

先来回顾下InputDispatcher和InputReader是在哪创建的,InputManager的构造函数如下所示。
frameworks/native/services/inputflinger/InputManager.cpp

1
2
3
4
5
6
7
8
InputManager::InputManager(
const sp<EventHubInterface>& eventHub,
const sp<InputReaderPolicyInterface>& readerPolicy,
const sp<InputDispatcherPolicyInterface>& dispatcherPolicy) {
mDispatcher = new InputDispatcher(dispatcherPolicy);
mReader = new InputReader(eventHub, readerPolicy, mDispatcher);
initialize();
}

可以看到InputDispatcher和InputReader是有关联的,InputDispatcher会作为一个参数传入到InputReader中。
InputDispatcher是在InputReader之前创建的,这个顺序不能改变,因为要确保InputReader将加工后的输入事件交给InputDispatcher时,InputDispatcher已经被创建。
InputDispatcher的定义如下所示。

frameworks/native/services/inputflinger/InputDispatcher.h

1
2
3
4
5
6
7
8
9
class InputDispatcherThread : public Thread {
public:
explicit InputDispatcherThread(const sp<InputDispatcherInterface>& dispatcher);
~InputDispatcherThread();
private:
virtual bool threadLoop();
sp<InputDispatcherInterface> mDispatcher;
};
}

InputDispatcher.h中定义了threadLoop纯虚函数,InputDispatcher继承了Thread。native的Thread内部有一个循环,当线程运行时,会调用threadLoop函数,如果它返回true并且没有调用requestExit函数,就会接着循环调用threadLoop函数。
查看InputDispatcherThread的threadLoop函数是如何实现的。
frameworks/native/services/inputflinger/InputDispatcher.cpp

1
2
3
4
bool InputDispatcherThread::threadLoop() {
mDispatcher->dispatchOnce();
return true;
}

threadLoop函数中只调用了InputDispatcher的dispatchOnce函数:
frameworks/native/services/inputflinger/InputDispatcher.cpp

1
2
3
4
5
6
7
8
9
10
11
12
13
14
15
16
void InputDispatcher::dispatchOnce() {
nsecs_t nextWakeupTime = LONG_LONG_MAX;
{ // acquire lock
AutoMutex _l(mLock);
mDispatcherIsAliveCondition.broadcast();
if (!haveCommandsLocked()) {//1
dispatchOnceInnerLocked(&nextWakeupTime);//2
}
if (runCommandsLockedInterruptible()) {
nextWakeupTime = LONG_LONG_MIN;
}
} // release lock
nsecs_t currentTime = now();//3
int timeoutMillis = toMillisecondTimeoutDelay(currentTime, nextWakeupTime);//4
mLooper->pollOnce(timeoutMillis);
}

注释1处用于检查InputDispatcher的缓存队列中是否有等待处理 的命令,如果没有就会执行注释2处的dispatchOnceInnerLocked函数,用来将输入事件分发给合适的Window。注释3处获取当前的时间,结合注释4处,得出InputDispatcherThread需要睡眠的时间为timeoutMillis。最后调用Looper的pollOnce函数使InputDispatcherThread进入睡眠状态,并将它的最长的睡眠的时间设置为timeoutMillis。当有输入事件产生时,InputReader就会将睡眠状态的InputDispatcher
唤醒,InputDispatcher会重新开始分发输入事件。

InputDispatcher中还有个notifyKey方法,notifyKey被之前的inputreader调用,notifyKey调用interceptKeyBeforeQueueing,

进行第一次按键上报,供上层截获按键,在按键被压入队列前进行必要的处理,如设置,桌面等在keyfuntion.xml中配置的快捷键,或待机键等的处理。

/frameworks/native/services/inputflinger/InputDispatcher.cpp

1
2
3
4
5
6
7
void InputDispatcher::notifyKey(const NotifyKeyArgs* args) {
KeyEvent event;
event.initialize(args->deviceId, args->source, args->action,
flags, keyCode, args->scanCode, metaState, 0,
args->downTime, args->eventTime);
mPolicy->interceptKeyBeforeQueueing(&event, /*byref*/ policyFlags);
}

到这里完成按键进入Queue队列前的上报处理,如果interceptKeyBeforeQueueing没有处理这个按键,将会继续调用enqueueInboundEventLocked。

总结

回头看整个按键转换和分发流程,有两个根节点:

  1. 第一层次读取linux键值的进程,**android_ir_user这个bin文件,由系统脚本开机拉起

  2. 第二、三层次的按键分发,总源头为SystemServer这个服务的启动,由android系统开机启动,详细流程参见 android SystemServer启动流程

以上除了第一层次linux键值的获取外,其他所有层次实际都是一个通用的转换和上报过程,最终到达PhoneWindowManager的interceptKeyBeforeQueueing和interceptKeyBeforeDispatching后,按键是以KeyEvent类实例作为参数传入的,并且必须以getKeyCode来访问实际android键值。